
here's the recipe:
12 small hand prints (change servings and units)
Ingredients
4 cups flour
1 cup salt
1 1/2 cups water
Directions
1
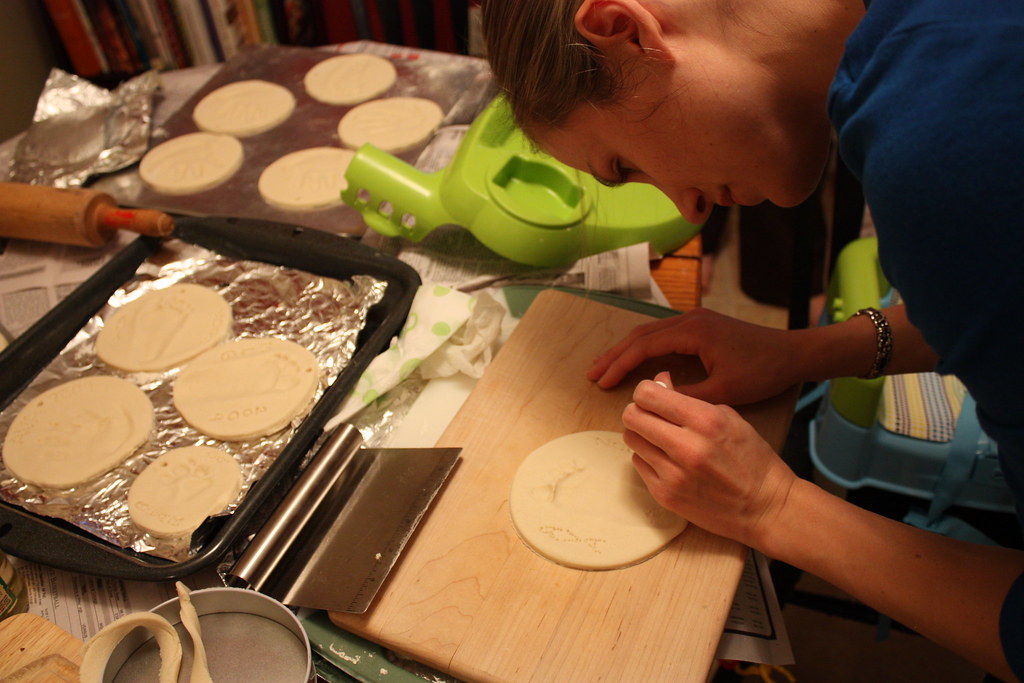
Combine ingredients and knead dough for 15 to 20 minutes.

2
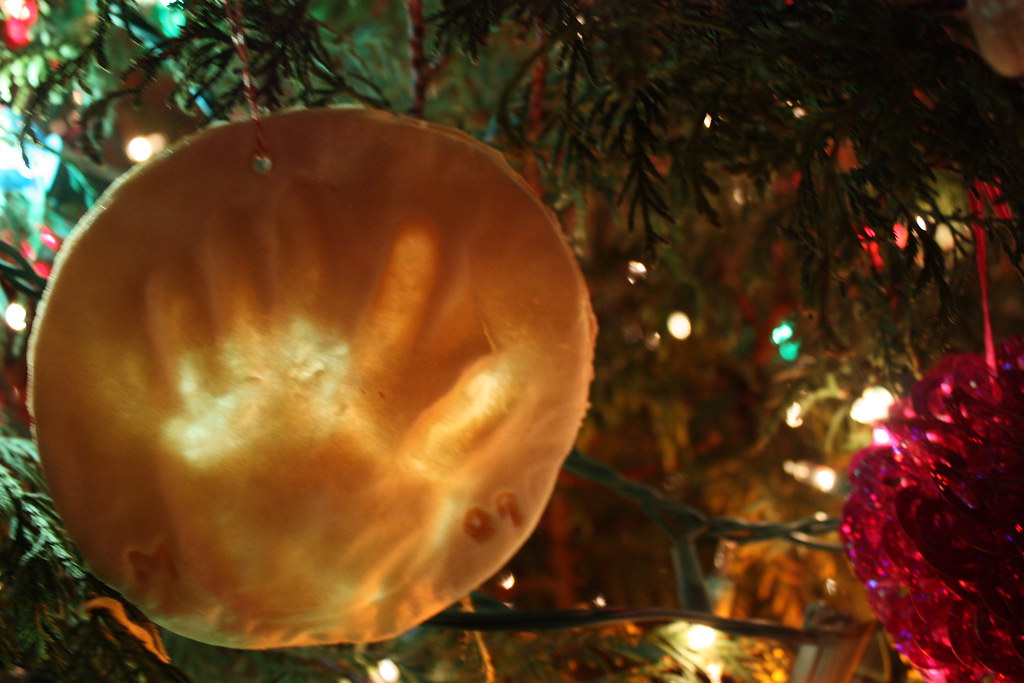
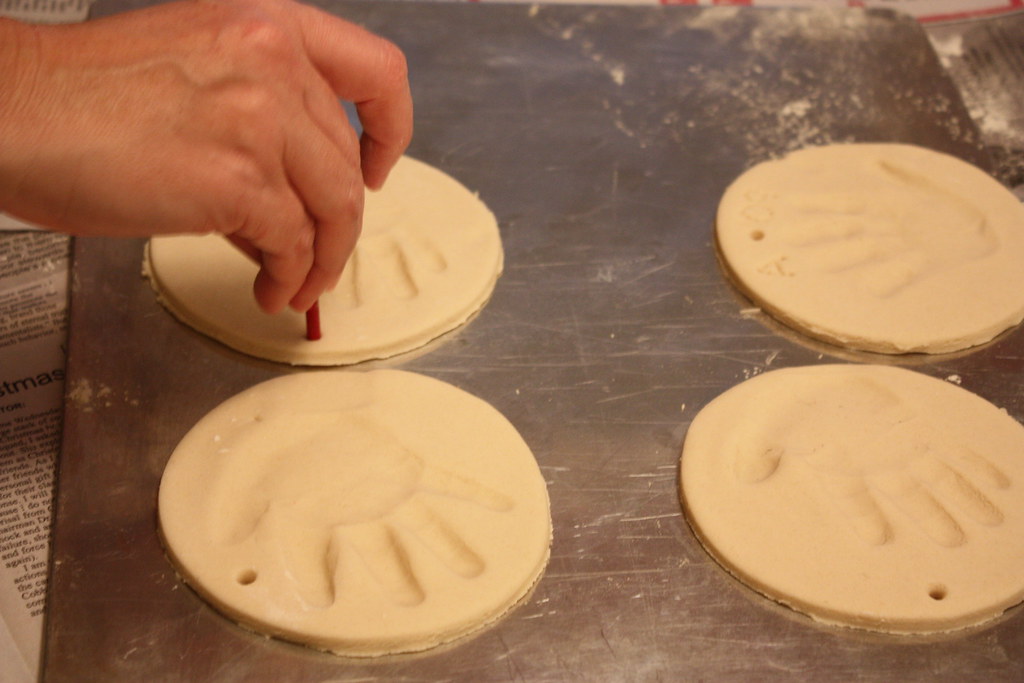
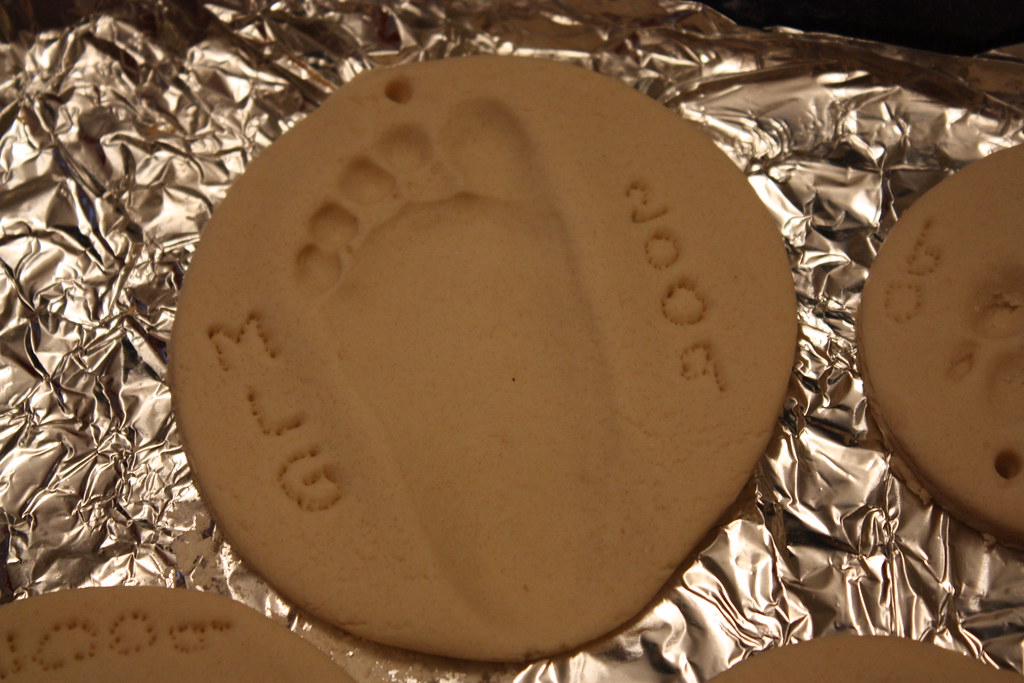
Roll dough out and cut around hand or cut circles out for making hand imprints. Use cookie cutters for ornaments or gift tags. If necessary, slightly dampen pieces to make them stick together.
3
Make a small hole for the hanger and prick to prevent air bubbles.

4
Bake at 300ºF about 20 to 25 minutes or until golden. You may have to bake considerably longer depending on how thick your items are. They may not feel hard right away but will harden as they cool.
tip: make sure to use a nonstick surface, or spray cookie sheet with pam. if you do get some stickage, cover the back with felt or cardstock. attach with hot glue gun.
5
Paint and decorate as desired. Acrylic paints work best and use a varnish to make them shiny.
{source: recipezaar}
© copyright homemade grits
thanks for posting this! i want to preserve all these memories from when my kids are small!
ReplyDeleteI LOVE this idea!
ReplyDeletecute! i had the children's feet done at a country fair!
ReplyDeletesooooo cute!
Thanks for the recipe. We used it to make dinosaur fossils instead and they came out great! http://dontmesswithmama.com/2011/09/12/diy-dinosaur-fossils/
ReplyDeleteSo cute! Saw this on pinterest and pinned it :) I am so making these for either milestones or for Christmas.
ReplyDeleteI'm a new follower!
Moore Babies
Can you color the dough? Want to do this with 4 year olds and not sure I want to use acrylic paints with them.
ReplyDeletehey lauren! we did not paint ours, but you could probably use food coloring in the dough for a similar effect. let me know how it turns out!
ReplyDeleteI also saw this on Pinterest and am excited to try it! I was going to buy kits for $10 a piece to do this with my twins, but you saved me the cash. I am wondering if food coloring will work as well since my girls are only 3 months old. I am concerned it would turn out more pastel colors than Christmas colors. Let us know if anyone tries it!
ReplyDeleteThanks for this frugal craft and great memory maker! I did everything like instructed but while baking, the imprints kinda blended and not all the imprint shows.
ReplyDeleteI did this and while baking the imprints blended and didnt show as well.
DeleteI am doing these with my two little ones. I am going to cover the back and attach a picture of them at this age to match the handprint.
ReplyDeleteHello! This is such a sweet idea! I was wondering if this gets firm like ceremics? and can you use the acrylic after you bake them? Thank you!
ReplyDeleteI'm excited to make these with my boys! I featured this today at Over the Big Moon! You can see it here: http://overthebigmoon.blogspot.com/2011/11/winter-wonderland-pre-k-pack.html
ReplyDeleteThanks!
Pam
www.overthebigmoon.com
This is on our list for this year!! How many ornaments will this make (based on the sizes pictured)? Thanks for a precious idea!!
ReplyDeleteI was wondering if you could paint them,KKof5
ReplyDeleteI've stolen your idea, too. We made ornaments and turkey-hands. Super cute. Thanks for sharing!
ReplyDeleteHaikuoftheid.blogspot.com/2011/11/j-i-n-jingling-Bells.html
Hi, love this idea. When we made them they bubbled up though. Do you have any suggestions for that?
ReplyDeleteThank you
Mine bubbled up too
Delete. Can't see the handprint anymore
re: anonymous
ReplyDeletethese do get hard like ceramics
re:mollie
i think this recipe made about 12 ornaments...
re: kk
yes, it is recommended to paint them with acrylic paints
re: anonymous
not sure why they would have bubbled up?
Mine didn't turn out like I thought they would. You couldnt see the handprints or footprints very good maybe I'm doing something wrong? My dough was kind of dry and very tough to roll out
ReplyDeleteHi! Can this be made using a Kitchenaid mixer? How long would I mix for? (I'd rather not knead for 15-20 mins, lol). :)
ReplyDeletere: tanya
ReplyDeleteit's probably fine. honestly, i made this with friends two years ago so it's hard for me to even remember the kneading. good luck!
what kind of varnish would you recommend? could you cover it with mod podge?!
ReplyDeletecould you make this ahead of time and use it the next day, or do you have to use it immediately?
ReplyDeleteThank you for the recipe!!! I used it a few times to find out what works: Using your ingredients - cooked at 300*, but for two hours long. I had bubbling issues too - you have to poke your creations with a toothpick all over to avoid the trapped air in the dough expanding. also, using PAM or the like on the cookie sheets helps a lot. Might leave a slightly darker part on the dough, but paint covers it right up. I've been using Americana (i think) varnish from Michaels. Used acrylic (not fast drying) paints and then the varnish. Wonderful recipe!! Thanks for sharing it!
ReplyDeleteThanks girl!!! My sister-in-law and I made these tonight with our kiddos... for the grandparents.... we followed your tutorial the whole time. Thanks so much!!!!!!!! High Five!!!
ReplyDeletejust made these with my 23 mth old. the dough was a mess for a while. i was beginning to think there was no hope for it, but as my little girl said "we just pressed and pushed it". they're in the oven baking now! thank you for posting! i'm sure grandparents will thoroughly enjoy these when they open them CHRISTmas morning! :D
ReplyDeleteWhen you say "poke them all over" do you really mean like ALL over? I adore the idea but don't want to mess up the work of getting a good imprint with either A) tons of prick holes or B) having it raise up and lose the imprint.
ReplyDelete@tracy- the recipe says to "prick them" which i took to mean make a few pricks in them. the holes won't show up. good luck!
ReplyDeleteWhat kind of flour? All purpose or self rising?
ReplyDeleteLove this! Ours are baking right now. We experimented with some sugar (red or green food color mixed with sugar) sprinkled all over the top. Hoping this will give them a crystallized look. Thanks again for a great Christmas idea to do with little ones!
ReplyDeletere: anonymous
ReplyDeleteall purpose flour
thanks everyone for your fun comments! i love that so many people are using the recipe!
Mine are in the oven right now! I'm so excited to see how they turn out. I did some hand prints, some foot prints, and a christmas tree with the whole family's finger prints that I will paint to look like ornaments. Thanks!
ReplyDeleteMine are in the oven baking now. We are making the santa hand ornament, a snowman and a pizza ornament. My son had to have it.
ReplyDeleteGreat idea, I did these with my kids last night. They turned out so cute, except they cracked...not all the way through but like a crackle look in top. Any suggestions on what to do differently next time so they stay smooth? Thanks!
ReplyDeleteTurned out not too bad! Added some Blue food coloring for my boys. Found that my 18 month olds hand print was huge... But worked great on my 2 month olds foot print. Thanks for posting, it's a great idea for saving their hand/foot prints
ReplyDeleteCan you use this for making car coasters for the drink holder in your car?
ReplyDeleteCan you just leave them to air dry??
ReplyDeleteThank you for this idea, I have been looking for a creative present for the grandparents this year!
ReplyDeleteI did add some green food coloring and a little bit more water to help make the dough easier to manage. They look so adorable and the Grandparent are going to love them.
re: debbie i would not use them for coasters as they are not water resistant in the slightest.
ReplyDeletere:anonymous yes they can air dry
so glad they are turning out nicely for most of you. hope they make sweet gifts for your loved ones!
I was just curious if these will be good for years to come? If I do not spray with any kind of sealer, will they mold, or crack over time? I have been wanting to do hand prints of my 6 month old daughter for Christmas orniments but the kits are around ten dollars a piece and I need six. Her little hands will only be this sweet size once, and I would hate to make these and the orniments only last a year or two.
ReplyDeletere: anonymous for longevity sake you may be better off with a ceramic kit. these are adorable but even in just two years there is some wear and tear. may be worth the splurge if you want them for years to come!
ReplyDeleteHey check your local tj maxx for a ceramic kit. I found one for $6 for my daughter. Am making these now and they look good so far! Thanks for the tutorial.
ReplyDeleteRe: anonymous
ReplyDeleteI made these when I was little with my parents. They are still in good condition (at least 20 yrs old) and hanging on my own christmas tree now. I would say they have lasting power without having any sealer or anything.
I did this today with my 2 month old, I followed the recipe to the tee and they cracked, not horribly, but they do not look like yours, any reason why? Should I try adding more water next time? I dont think I have the heart to give these ones out for Christmas because they are so cracked.
ReplyDeletere: new mommy
ReplyDeletei'm not sure why they cracked? you may want to read through the comments to see what worked for others. sorry that happened. congrats on your new baby!
Great post! I tried this recipe with my daughter and they turned out great. I wrote about it on my blog and linked your post:)
ReplyDeleteI am making these right now, but we are having a hard getting my kids' hands to push into the dough enough to make a big enough print. The dough was just very tough. Was your dough tough, or should I add more water? My kids are just 3, so maybe they aren't strong enough, but even with me pushing hard on their hands, it just wasn't imprinting very well. Did you find this to be true also, or have I completely messed this up!? :)
ReplyDeleteI'm a teacher. We want to make these for their parents but we don't have an oven. How long do they take to air dry?
ReplyDeleteWe made these yesterday with my 19 month old. She wasn't too excited about pushing her hand down but they turned out great!! Only one (out of 3) cracked but it's just a little on the back. We're going to paint just her hand pink. The grandparents will LOVE them I'm sure!! Thanks for the idea!
ReplyDeleteI added a tablespoon of cinnamon for scent and an extra 1/2 cup of water. They smell fabulous! I made them big enough to glue a wallet sized photo of my son with Santa on the back! Great "Baby's First Christmas" gifts for the grandparents and great-grandparents!
ReplyDeleteThanks so much for this idea. We just made them and they turned out great. The only thing is that you can still see all of the dots I made. I pressed very lightly with a toothpick but they are still visable. At least I don't have any bubbles!
ReplyDeleteI used pink food color for my daughter, 11 months. Its for the grandparents since it is the first Christmas with her. They worked great. I used about half oil and half water, to see if they wouldn't crack and they didn't. I also only put them in the oven for 15 minutes at 200, then let them air dry. Love the idea and worked great! :)
ReplyDeleteWe did a super-sized version. Mommy's hand + Daddy's hand = baby's hand! Square in shape. Cooking now.... we'll see how it turns out!!!!! I think i will paint white after ;) I wish I had better tools to make the math symbols.
ReplyDeleteI wonder if mixing glitter into the dough would work well? I feel that it would make it very pretty!
ReplyDeleteAlso, I wonder if air drying would help avoid cracks??
Anybody know if you can make the dough ahead of time? I am also a teacher and don't realistically see myself making this right before my kids get to school!!
I wonder if mixing glitter into the dough would work well? I feel that it would make it very pretty!
ReplyDeleteAlso, I wonder if air drying would help avoid cracks??
Anybody know if you can make the dough ahead of time? I am also a teacher and don't realistically see myself making this right before my kids get to school!!
December 14, 2011 5:09 PM
I just made a batch last night and refrigerated it for today, YES you can make the dough ahead of time :)
I love this post!! Thanks. I just took mine out of the oven and they are hard...yay! I followed another blogger's instructions (regrettably) and baked for one hour at 200 degrees. I'm going to try your method the next time because I think it's so ridiculous to wait 4-6 hrs for ornaments!!!
ReplyDeleteSo I just made these the other day, and I did 1/2 the recipe, I did half water and half oil, with about 1/2 cup more water ( if that makes any sense ) I only kneaded it for about 10 minutes because I have carpal tunnel and it was TORTURE! I put them in the oven at 200 for about 30 minutes, then shut it off, but left them in there for the rest of the day. I pulled them out, and they've been air drying ever since, so about 2 days now. They're still not 100% dry, but no cracks or bubbles!
ReplyDeleteJust made these and the dough was too tough for my 1 year old to be able to leave an imprint in the dense dough. I have round ornaments but no hand/footprints to show for it.
ReplyDeleteWe just tried this out today. It's such a cute idea! I halved the recipe as we only wanted to do three handprints. I had to add quite a bit more water to get the dough soft enough to be able to do an imprint, though. I followed the recipe exactly as written and kneaded it for a few minutes, but it was clear that it was never going to come together unless more water was added. I added it gradually as I kneaded (dough does become more pliable the longer you knead it), and ended up using about 1/2c more water.
ReplyDeleteI've got them cooking in a lower oven for a longer time to avoid bubbles. Fingers crossed!
I Found this on pintrest and have been meaning to do it for a few weeks now, so tonight before baking anything I decided we would make these!
ReplyDeleteI cut the ingredients in half as I only wanted enough to do hand prints for my three children and it was the perfect amount for an almost 8 year old,3 year old and 15 month old we only had to throw a tiny bit away! the dough was a little tough to work with but it was a welcome arm workout haha the kids loved pressing their hands down I had my husband help them and it seems as of right now that the prints will be pretty nice, they are only half way done baking so maybe I will update my comment when they are complete.
I did poke them all over with a toothpick and at this point you can most certainly see that, so we will see if it bakes away other wise will get creative and decorate.
This comment has been removed by the author.
ReplyDeleteok so fallow up, the ornaments are done and they did not crack at all etc.. so that is great but every little tooth pick prick does show, ours are a bit thick and baking at 50 minutes on about 325 was perfect! the prints are just as they were before baking
ReplyDeleteThanks again for this !!
We did this craft with our 2 year old granddaughter and it worked very well. To make the hand print show up a little better we put sprinkles on just the print. This was something she could do so it did make the project more of her own.
ReplyDeleteJust made these today. I added 1 Tsp of olive oil and used a small pin to make a lot of little pricks through out. I had no bubbles and no cracks. Also, I put them in the oven at 300 degrees for 1 hour and they where dry. I can't wait for the kids to paint these. Thanks for the idea.
ReplyDeleteInstead of placing them on a cookie sheet I used a grilling screen and wax paper. The wax paper stuck some but the screen helped cook them evenly and avoided bubbles and dark spots.
ReplyDeleteLOVE this post & recipe!!! Thanks SO much!! I made 3 batches of keepsake ornaments with my twins, can't wait to share these for Christmas!! Few things I did that made mine come out perfectly: used my Kitchenaide mixer to knead the dough (added a bit more water than the recipe), used a needle to prick the ornaments once we were done with the impressions...and my favorite... My hubby had the GREAT idea of using tiny eye hooks at the top instead of poking a hole for the ornament... Turned out super cute and well thought out!! We got 100 hooks for about five bucks. After I finished painting with acrylic I used a spray varnish from The local craft store and tied a ribbon through the hook. LOVE, LOVE, LOVE!!! Thanks again!!! Becky
ReplyDeletePS I did have to bake quite a bit longer...they weren't super hard when I took them out but they continued to harden. I waited at least one day post painting to seal with varnish. Did I mention how much I LOVE these ornaments?!? You Rock, thanks again!!! Becky
ReplyDeleteThese are too cute! I just made some footprints of my 4 month old, which was NOT easy..he kept curling his toes, LOL, but I'm sure the gparents will understand ;) I won't make it out to get any varnish to seal them before Christmas, so I was wondering if maybe some olive oil would work? They're not really golden, except where the Pam soaked through around the edges, might that even out the color?
ReplyDeleteThis comment has been removed by the author.
ReplyDeleteThis is a great idea... but I just tried it and it turned into a crumbly mess. I halved the ingredients, but even after kneeding for 20 minutes, I was left with a bunch of crumbles...
ReplyDeleteI am not sure what I did wrong, it was really gooey even after kneading it :( such a cute idea! Any suggestions?
ReplyDeleteThank you sooooo much for sharing. Such treasure are so valued. Thanks again.
ReplyDeleteThank you sooooo much for sharing. Such treasure are so valued. Thanks again.
ReplyDeleteI did this and it turned out great. i just poked holes in the back so the fromt wasnt ruined. i also only put it in the oven for 15 min and let the rest air dry.
ReplyDeleteGoing to use this idea for my husband.... Going to make a keychain of our daughter's hand for his 1st Father's Day. Soooo excited!
ReplyDeletei just made these and i used the jel food coloring to dye them and it worked wonderfully.. will make them again.. thanks for the recipe
ReplyDeleteSaw this on Pinterest. Thanks for the idea. I will be making these with my class for Grandparent's Day!
ReplyDeleteI am The Handprintlady and I invented a no muss, no fuss way to do baby handprint ornaments BY MAIL, professionally fired in a ceramic kiln for heirloom quality. You can go to my store at http://www.etsy.com/shop/handprintlady to order.
ReplyDeleteI invented a no muss, no fuss way to do baby handprint ornaments in kiln fired ceramic clay BY MAIL! I am the Handprintlady and my store is at http://www.etsy.com/shop/handprintlady . Check it out!
ReplyDeleteThanks for the Post, I don't have children but I made one with an imprint of our house key... having our first christmas in our first home this year. :)
ReplyDeleteThis is such a cute idea!
ReplyDeleteI made so many that I could not bake them all at once. I found that the ones I baked right away turned yellow & bubbled up, the ones I let sit out over night & baked the next day kept their original color & stayed nice & flat & kept their form around the edges. My suggestion would be to let them sit out over night before baking & they look exactly as they did when the were removed from the cookie cutter
ReplyDeleteI made these two different times. The first had a problem with minor bubbles but still turned out great! The second I baked longer and they were so hard and no bubbles, turned out great!! Make sure you use the right amount of salt! The first time I ran out of just enough but made them anyway! These are the cutest thing. Made "mommy and me" and daddy and me handprints! Used a round pot lid to make them perfect circles!
ReplyDeleteI have followed the recipe to the T and also left the dough overnight in the fridge so it could get hard.
ReplyDeletehave just finished baking 3 and to be honest with you, they look like pizza and ready to eat!!!!!
Wondering if this is all true lol.
Thank you for the recipe. I plan on doing these today with my children.
ReplyDeleteThis SUCKS!! I was so excited to make these with my two daughters and my 6 year old so so thrilled but when I made these it was so flaky and wouldn't form into a ball. I kneed and kneed and even added small amounts of water and these just wouldn't turn out.
ReplyDeletewanting to know if u can air dry them for a couple of day?
ReplyDeleteI am in the middle of making these. I took Meredithdamama's advice and baked them for 2hrs at 300 degrees as well as poked them with holes, using toothpicks. I have about 20 minutes left and they look perfect. I still see the toothpick holes though :-( I am changing mine up a bit to look like something else I saw. I cut around the handprint and will be painting it upside down to look like Santa's head. The fingers are the beard and the thumb is part of his hat. Super cute. Can't wait to paint them!
ReplyDeleteI'm not exactly sure what I did wrong but I followed the directions. They front looks cute but the back of the ornaments look uncooked still and are not hard. I even flipped them over and contended baking for a few hours and also let them air dry for a few days. Is this normal? I'm afraid to paint them for fear of the moisture in them causing them to mold. I'm running out of time,mi wanted to do these for Christmas gifts for the grandparents. Any suggestions????
ReplyDeleteJust got mine out of the oven...for those that had issues, I'd be very careful about measurements. Being slightly off can have a huge effect on the end product! Ours look great....I baked them for 30 min and they look great.
ReplyDeleteQuestion about painting. How long do you allow the acrylic to dry before using the varnish? Is there a certain type of varnish to use? (I've never used it before)
I really appreciate your post. I will definately try this with my 7 grandchildren for this Christmas Holiday Ornament Event. These are sooo cute. I think I will also add food coloring as well.
ReplyDeleteThank you so much for this recipe! I made the dough when I hosted playgroup and the kiddos all got to make a few hand prints. I used the extra to make cut outs while my son was napping and he painted them when he woke up. He has been giving them as gifts and they turned out great!
ReplyDeletehttp://jemabebo.blogspot.com/
I was excited with how mine turned out until about 6 days later when every one of them started cracking in half. I painted around the hand print with acrylic paint but did not paint in the hand print so you could see them better. I had not yet used varnish...was that my problem i wonder?? Super bummed as now I don't feel like I have enough time to make them again and make sure they don't crack. My 2 1/2 year old loved making them, just disappointed about them cracking.
ReplyDeleteI did this last night and got mixed results. I found the dough to be too hard for really young children to get a good imprint without using a machine press on their hands or feet. Wetting the surface helped a lot. Unfortunately, I believe this caused the giant air bubble I got when I baked them. 30 minutes was not enough as there were still soft spots when I took them out.
ReplyDeleteSome of the variation that people are experiencing might be due to variances in humidity and brand of flour. These factors have a huge impact on baking bread, so they might here as well.
If the quantities could be put into weight instead of dry measure, this recipe would work more consistently. I'll try to do so when I do this again this weekend.
For anyone who has a hard time with bubbling and expanding during baking, don't bake them. Unless you are in a hurry to complete them, why not take the time to let them air dry. It takes 5-7 days for me here in Houston, but the results are worth it. Nice and smooth. Just flip them over once a day after the side facing up looks dry. I use acrylic paints too and then sprayed the ornaments with clear spray paint.
ReplyDeleteI love your christmas decorations ideas! Thanks for sharing a step by step procedure for the ornaments. I will try it at home.
ReplyDeleteCheers and hugs,
Cathy
Christmas Decorations
wow, these grits are absolutely awesome, I would like you to list some more handmade christmas decorations ideas, so that I can read about it more and more.
ReplyDeleteSo much fun! That would be such a sweet keeper!
ReplyDeleteFor anyone else reading this and concerned about bubbling - I put the oven at 200 degrees (F) and baked for a couple of hours. One of them curled a little, but the rest are fine. Hope this helps!
ReplyDeleteDo u put that acrylic paint on them after they start drying
ReplyDeleteDo u start to cut them out after u make them haven't done them so going to do the air dryin one
ReplyDeleteThanks for sharing this wonderful tutorial. Its really inspiring and looks fabulous . Good Job.
ReplyDeleteCheers !!
I tried these, the handprints blurred, the ornaments bubbled, twenty minutes was not NEARLY long enough (closer to 45), and when I finally thought it had been way too long, half were burned on the bottom and the other half are still soft. Not to mention the two hours it took. No thanks. I'll look elsewhere in the future, like a professional. SMH
ReplyDeleteI did this with my classroom kiddos. They loved the feeling of sticking their hand in the dough. You have to be careful not to make them too thick or too thin, they will crack in the oven. Another problem I had with ours was the bottoms not getting done. I decided to cover the bottoms with felt. So being done with them finally, they turned out good! Will definitely try this again for future holidays in the classroom.
ReplyDeleteI made these the other day and they turned out wonderful! I cut down the recipe because I just needed it to make a paw print ornament for my dog and a little reminder ornament of our apartment key. I used the amount exactly: 1 cup flour, 1/4 cup salt, 6 tablespoons water. The dough was a little tough, but after I worked with it, it became more supple. I put the ornaments in the oven for 30 minutes at 250 degrees F. At first, I thought they were done and I took them out and let them dry. There were no cracks or puffiness. The next day, they were kind of soft again. I went ahead and painted them anyway with acrylic paint. Plan on sealing them today. I hope they harden up through time. Thank you so much for this recipe!
ReplyDeleteI made these the other day and they turned out wonderful! I cut down the recipe because I just needed it to make a paw print ornament for my dog and a little reminder ornament of our apartment key. I used the amount exactly: 1 cup flour, 1/4 cup salt, 6 tablespoons water. The dough was a little tough, but after I worked with it, it became more supple. I put the ornaments in the oven for 30 minutes at 250 degrees F. At first, I thought they were done and I took them out and let them dry. There were no cracks or puffiness. The next day, they were kind of soft again. I went ahead and painted them anyway with acrylic paint. Plan on sealing them today. I hope they harden up through time. Thank you so much for this recipe!
ReplyDeleteAfter examine a number of of the weblog posts on your website now, and I really like your manner of blogging. I bookmarked it to my bookmark website record and will likely be checking back soon. Pls take a look at my website online as nicely and let me know what you think. online casino games
ReplyDeleteit's so refreshing to see a post that talks straight to the point. thanks so much for writing about this it has really helped me with building my experience. thanks a lot
ReplyDeleteGolden and Labrador Retriever Puppies For Sale
Golden Retriever Puppies For Sale
Labrador puppies for sale near me
Black Labrador puppies for sale
white golden retriever puppies near me
black and white.retriever puppies for sale
retriever puppies for sale
golden retriever puppies for sale cheap
golden retriever puppies for sale $200
golden retriever cute puppies
red golden retriever puppies
english cream golden retriever puppies
Labrador Golden Retriever Puppies For Sale
free labrador retriever puppies
labrador retriever puppies ohio
Golden and Labrador Retriever Puppies For Sale in NY
Labrador Retriever Puppies For adoption
golden retriever labrador mix puppies Sale
golden retriever vs labrador puppy
english labrador retriever puppies for sale
english labrador retriever puppies for sale near me
black english labrador retriever puppies
labrador retriever mix puppies
golden retriever labrador mix puppies
labrador retriever husky mix puppies
golden retriever lab mix puppies
golden retriever husky mix puppy
black lab golden retriever mix puppies
golden retriever mix puppies for adoption near me
cream and white golden retriever puppies
red and black golden retriever puppies
golden retriever puppies for adoption near me